
How to Build a Shaker Style Fireplace Surround: DIY Guide with Plans & Video
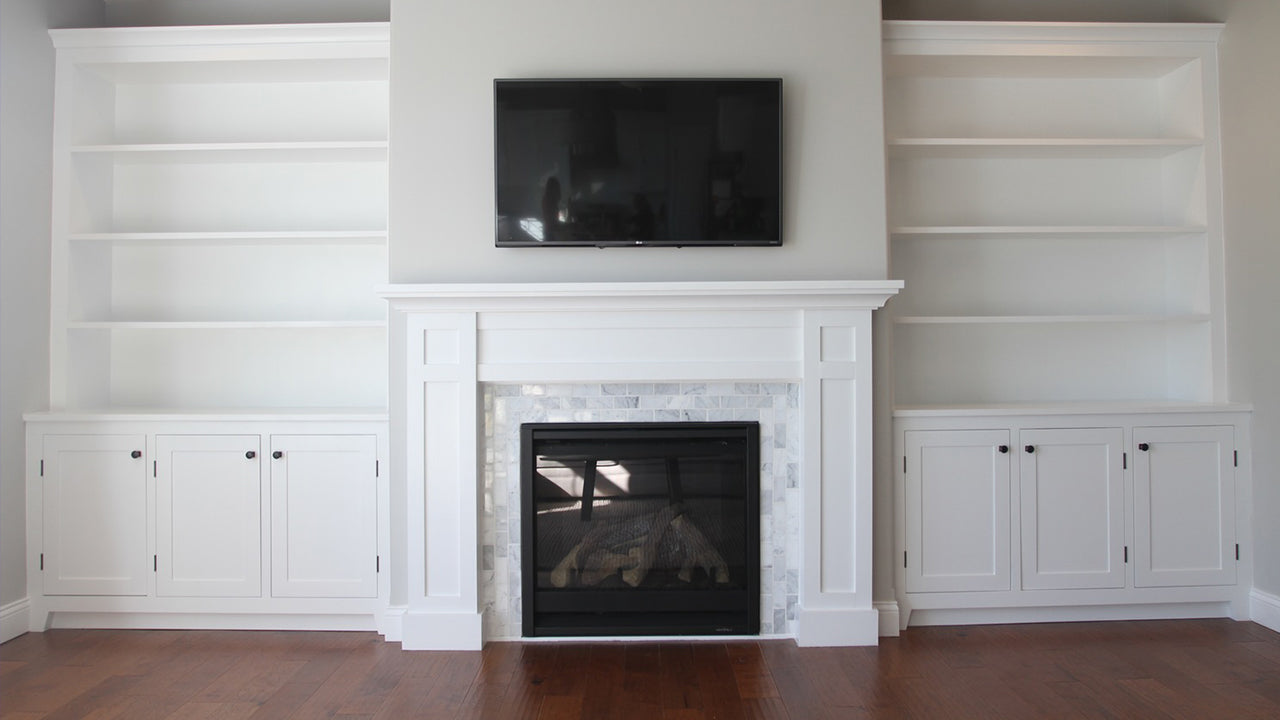
Transform your living room with a timeless Shaker style fireplace surround it's a classic, clean-lined focal point that brings warmth, charm, and function to your home. In this detailed DIY guide, you’ll learn how to build your own fireplace surround and built-ins with downloadable PDF plans, a 3D SketchUp model, and a step-by-step tutorial video.
Whether you’re going for a modern farmhouse feel or a minimalist aesthetic, this project is perfect for homeowners, woodworkers, and DIYers looking to upgrade their space.
🔥 Why Build a Shaker Fireplace?
The fireplace is often the heart of the living room—where stories are shared and memories are made. When my wife and I built our home, I knew I wanted a design that felt simple yet special. After considering Craftsman style, we ultimately chose a Shaker fireplace surround for its clean lines and timeless appeal—blending seamlessly with our modern farmhouse interior.
🪵 What Is Shaker Style?
Shaker style furniture and architecture originated from the 18th-century Shaker community, known for valuing simplicity, utility, and honesty. Shaker design features:
-
Clean lines and balanced proportions
-
No ornate carvings or metal hardware
-
Functional, minimal, and visually calming aesthetics
-
Made from natural woods like cherry, maple, and pine
This makes the Shaker fireplace design ideal for nearly any home style—from modern to rustic farmhouse.
🧰 Tools & Materials for Your Shaker Fireplace Build
🔨 Skill Level: Intermediate to Advanced
🕒 Estimated Time: Two Weekends
💲 Estimated Cost: ~$1000
Materials List:
- Poplar Wood: 1×3 (36ft), 1×4 (6ft), 1×6 (24ft)
- Poplar Cove Molding: 9/16" x 3-1/2"
- Pine: 1×6 (6ft), 2×4 (8ft)
- MDF: ¼" Sheets (2x)
- Poplar Mantel: 1x5x60
- Carrara Marble for surround
- White Thinset Mortar & Grout
- Boss Dog Woodglue
- DAP Plastic Wood 4 Ounce
- Paint Brush Kit
- White Urethane Paint
- 1 1/4 in coarse pan-head coarse screws
- 220 grit 3M sandpaper pack
- 1-1/4in brad nails
- 3/4in brad nails
- For attaching tile to metal Liquid Nails Fuze
Tools You'll Need:
- Miter Saw
- Table Saw
- Cordless Nail Gun Kit
- Cordless Drill
- Orbital Sander
- Plunge Router
- Kreg Pocket Hold Jig
- Kreg Face Clamp
- Micro Jig GRR Ripper
- Dado Blad Set
- Tap Measure
- Hammer
- Level
- Putty Knife
➡️ [Download the Shaker Fireplace Full Built-in Plans (PDF + 3D Model)]
🧱 Step-by-Step Guide to Building a Shaker Fireplace Surround
✅ Step 1: Prepping & Tiling the Fireplace
Before tiling, check your local building codes and fireplace manual, fireplace surrounds get hot and require proper materials.

Pro Tips:
-
Don’t apply tile directly to metal. Use a product like Liquid Nails Fuze It Max for adhesion.
-
Wear latex-coated gloves, Liquid Nails is extremely sticky!
-
Use a temporary wooden bridge/frame to hold tiles in place while they set.
Watch the full install in my
🪚 Step 2: Assembling the Shaker Surround
Use the downloadable plans or Shaker Fireplace Kit to assemble your surround.

The kit includes:
-
Pre-cut wood components
-
Instructions for assembly
-
Note: The mantel is not included for flexibility on sizing and shipping costs.
If you're customizing your mantel, choose materials that match your space and use pocket hole joinery for strength.
🔨 Step 3: Installing the Fireplace Surround
Mount the fireplace boxes to the wall using 2x3 wood blocks secured with Liquid Nails and screws. These provide a strong anchor point.

Attach:
-
Side panels
-
Crown molding or trim
-
Center mantel support
Then secure the mantel shelf to the center box using screws and wood glue. Cover screw holes with wood putty and sand smooth.
🎨 Step 4: Painting and Finishing

Before painting, fill all cracks and seams:
-
Use caulk instead of wood putty in areas exposed to heat
-
Sand all surfaces smooth
-
Apply 2–3 coats of high-quality semi-gloss paint (I used Sherwin Williams Pure White)
Painting tip: Always use premium paint for trim and built-ins—it resists chipping and enhances the final look.
📦 Download or Buy Your Fireplace Project Materials
You can download the full project plans or buy the Shaker Fireplace Surround Kit to save time and tools. Perfect for DIYers of all skill levels!
👉 [Download the Full Fireplace Surround and Bookshelf Cabinet Plans]
👉 [Shop the Kit]
🎥 Watch the Full Shaker Fireplace Build Video
For a detailed walkthrough, including tips on cutting, tiling, and installation—watch the full build on my YouTube channel. Don’t forget to like, comment, and subscribe for more DIY home improvement and woodworking projects!
📌 Pin and Share This DIY Fireplace Project
Love this project? Share it on Pinterest and tag me with your build!
Use hashtags:
#DIYFireplace #ShakerFireplace #WoodworkingPlans #ModernFarmhouse #HomeImprovement #BuiltInFireplace #FireplaceMakeover

💬 Final Thoughts
Don’t be intimidated by this project. If you can measure, cut, and drill, you can build this Shaker-style fireplace surround. Whether you’re building from scratch or starting with the kit, this DIY project will transform your space and give you a sense of pride every time you light a fire.
Let me know in the comments if you have any questions, or what paint color you’re considering! 🔥


