If you’ve been dreaming of a custom walk-in master closet but were shocked by professional installation costs, you're not alone. Most high-end closets can run upwards of $15,000—but I built mine for just $1,000 in materials!
In this guide, I’ll walk you through every step of how I designed and built a shaker-style reach-in wardrobe system for my 8x9.5 ft master closet, complete with LED lighting, drawers, shelves, and hanging rods. Plus, I provide a downloadable PDF plan and 3D SketchUp modelso you can modify it for your space.
Watch the Build Video
✅ Why This Closet Build Works
Custom design fits your unique layout
Reach-in shaker-style wardrobes for a high-end look
Modular platform system for easier installation
Under $1,000 in basic materials
Expandable with optional lighting, drawers, and trim
📦 Materials Overview
Includes plywood, MDF panels, face frame boards, baseboards, paint, and LED strip lights from trusted sources like Home Depot and FlexfireLEDs.
Determine closet dimensions, inventory your wardrobe needs (long/short hanging), and layout shelves and drawers accordingly.
Step 2: Cutting Materials
Use a table saw or track saw system. Don't have one? No problem—I walk you through beginner-friendly alternatives.
Cutting your sheets of plywood to the proper lengths can be difficult if you don’t have a large table saw and out-feed table. That is ok, because you don’t necessarily need these expensive tools or setup to build this project. Here are other ways to cut down your large sheets of plywood.
TheDewalt Tracksaw Kitcost about $480 you would need to have a table or something like afoam insulation boardto put under the sheet of plywood so that when you run your tracksaw over the top of the plywood the blade has a safe and stable exit.
Once your sheets of plywood are cut down you want to move on to the next step.
Step 3: Painting Panels
Paint all plywood panels before assembly. This saves time and ensures cleaner edges.
Painting is your next step in building your master walk-in closet. Most people would wait to the end to paint their closet but I would recommend painting your sheets of plywood while they are not assembled.
This will save you time in the long run. I laid all my cut sheets of plywood flat on my garage floor and simply rolled them with a paint roller. This took me about 1-2 hrs to do and I applied two coats of paint per panel. I will show you how to do the final painting in a later step.
Letting them dry in the driveway.
Step 4: Assembling Wardrobe Boxes
I share tips on squaring large boxes, joining pieces with pocket screws and clamps, and setting up a solid platform base.
Assembly of your wardrobe boxes takes time and care. This is one of the most difficult challenges to building your custom walk-in master closet. You need to make sure your wardrobe boxes are square and this can be challenging due to the size of the boxes we are making. I recommend purchasing an accurate square and a quality clamp. Here are tools I would recommend purchasing if your budget allows.
The WoodpeckerPrecision Woodworking Square 26″is a versatile square that will help you make sure everything is square when you are assembling your boxes and installing them in your room.
TheKreg K4MS Jig Master Systemis what I would recommend using for this project as you will be creating a lot of pocket holes.
Before you install your wardrobe boxes you need to make sure you have a level and solid platform to attache them to.
I make my platform using 2×3. All the sizes and dimensions to my walk-in master closet can be found in my woodworking plans. I designed my wardrobes to have 1/2in gaps between each wardrobe box, this is to later feed electrical wire between the boxes and allow for any inaccuracies with my drywall not being square. Once the boxes are positioned in their place I inserted a 1/2in block and nailed the boxes together with a brad nailer.
Step 5: Installing LED Lighting
Use high-quality LED strips from FlexfireLEDs—better performance, longer lifespan, and a 15-year warranty.
Installing the LEDs was one of my most favorite parts of the build. I did a lot of research on what LEDs to purchase and here is the honest truth about LEDs. If you want good LEDs never buy them off Amazon. They are cheaply manufactured in China and there is little to no quality control. The closes thing you can get to quality LEDs from your local hardware or big box store is from Phillips Hue, however they are not as good as what I found or have as good as a warranty. I found my LED strip lights for my master closet from Flexfireleds they have the best LEDs and come with a 15 year warranty.
Their customer services is amazing. Ana, their design specialist helped me with all my questions and has been nothing but wonderful. The LEDs are on the pricey side however they are worth the investment and peace of mind that they will work and perform as promised and if you have any issues Flexfireleds will send you replacements at no charge!
Step 6: Attaching the Face Frame
Add durability and polish with solid wood face frames. I used poplar for strength and a premium finish.
Installing the face frame for the wardrobe boxes requires you to have a brad nailer. I purchased a nail gun kit for just about $230 on Amazon and the kit I got provides you 4 different types of nailers. I have used thisnail gun kitfor all my projects. It isn’t the best nailer out there but you can’t beat the price.
To install your face frame you will need to pre cut your wood. You need to use a sold wood like pine or poplar. Pine is cheaper but softer, I went with poplar for my closet as it is consider a hard wood and less likely to dent if I accidentally run into it or hit it.
Step 7: Final Paint & Touch-Ups
Sand, fill, and paint everything with urethane enamel paint for a durable, long-lasting finish.
After the face frame is installed it is now time to prep everything before you give your master closet its final paint job. The fist thing you need to do is patch all the brad nail holes and gaps. I would recommend usingDAP plastic wood puttyto fill in the gaps and holes.
Once the wood putty dries you need to sand it down. I would recommend wearing a mask as you will create a lot of dust and you do not want to breath any of the particles into your lungs. After you have sanded down everything and cleaned up the dust you can now apply the final coat of paint. I would recommend using aUrethane Enamelbased paint. The reason you want to use a Urethane Enamel based paint over an acrylic paint is that a urethane enamel based paint will cure much harder and last much longer. Acrylic based paint will be softer and if you lay objects on top of acrylic paint it can stick or be tacky. You really want to use a urethane enamel paint when you are paint a service that will hold items or objects like shelving and closets etc.
Step 8: Add Hardware
Install full-extension drawer slides, rods, sockets, and other closet hardware to complete the project.
Adding the hardware is the last step to finishing your master closet. The hardware you need depends on the type of closet you are making.
My closet has long and short hanging as well as drawers. I used metal hanging rods and brackets to hang my cloths. I decided to also purchase somenice clothes hangersfrom the container store.
If you decide to add a dresser to your master closet you will need to add drawer hardware and slides. Installing drawer slides is really easy.
There is a really simple and easy trick to installing drawer slides that don’t require any special jigs. Watch this video to see how you can install any drawer slide in 2min.
Use ½” spacing between boxes to allow for wire runs and drywall inconsistencies
Paint before assembly to reduce mess
Use brad nailers and clamps for clean joins
Add a full-length DIY mirror for that luxury feel (watch the video)
🏁 Final Thoughts
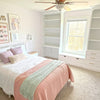
This DIY walk-in master closet project was one of the most rewarding builds I’ve done. The total cost (including hardware and extras) was under $1,800, saving me over $13,000 compared to hiring a contractor. And best of all? I got the exact layout and look I wanted—shaker style, reach-in wardrobes, drawers, LED lighting, and a full-length mirror.
Ready to build your own? Start by downloading the plans and watching my step-by-step video guide.


