
🪚 DIY Shaker Wainscoting Tutorial – Weekend Woodworking Project Under $100
Want to add character and depth to your walls without breaking the bank? In this step-by-step tutorial, I’ll show you how to build and install beautiful Shaker-style wainscoting for around $100 using simple tools and materials. This is the perfect weekend DIY woodworking project for upgrading any room in your home.
Whether you're renovating a living room, bedroom, or hallway, this project will help you improve your space—and give you hands-on experience with installing baseboards and wall trim.
🔨 Skill Level: Beginner to Intermediate
🕒 Estimated Time: One Weekend
💲 Estimated Cost: ~$100
📹 Step 1: Watch the Build Video
Before you start, watch my full build video on YouTube to follow along and see how I tied this project into existing trim work. Perfect for visual learners!
📏 Step 2: Measure Your Wall
Simple layout formula:
-
Measure wall length (e.g., 120" for a 10 ft wall)
-
Choose the number of panels (I used 5)
-
Divide length by number of panels → 120 ÷ 5 = 24"
This gives you the spacing for your vertical shaker slats. Be sure to align the center of each slat with the center of your measurement line.

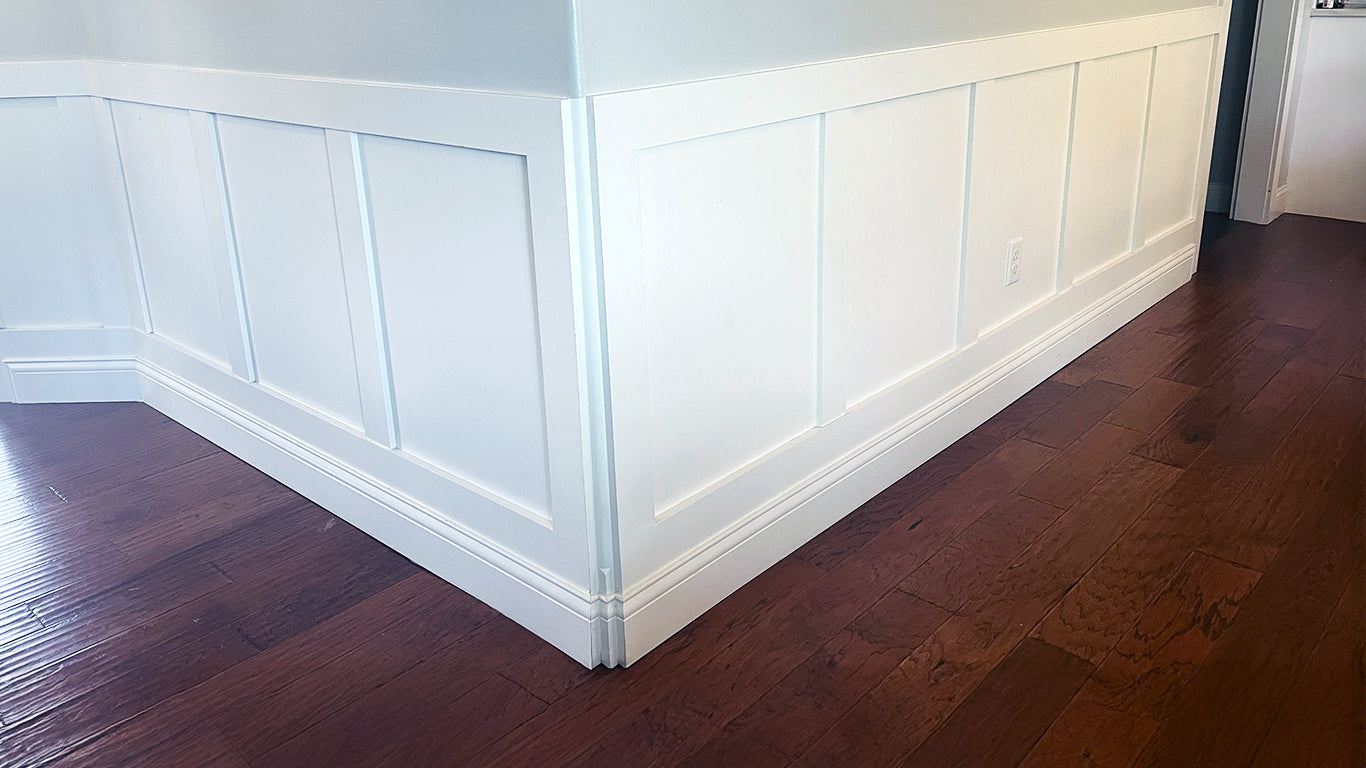
🪵 Step 3: Cut & Install Baseboards
Start by removing any existing baseboards. I used a 1x8 primed wood board to create a solid foundation for the wainscoting.
-
Attach your 1x8 using a brad nailer
-
Carefully miter corners (45° cuts) for clean transitions
-
Remember: baseboard may terminate near door trim—angle ends for a professional look

📐 Step 4: Install Vertical Shaker Slats
For added depth, I used ½" MDF sheets instead of standard ¾" boards. MDF is ideal for painted projects and cuts cleanly on a table saw.
Tips:
-
Use a scrap piece to set your table saw fence
-
Cut slats to uniform height using a miter saw
-
Stack and cut multiple slats at once for efficiency

🎨 Step 5: Prep & Paint
Before painting:
-
Fill all nail holes with wood putty
-
Caulk gaps for a seamless finish
-
Sand smooth and wipe off dust
Use a quality paint (I used Emerald Eggshell White) and apply with a brush and roller. Painting takes about 30 minutes and really makes the project pop!

✅ Final Thoughts: Why You’ll Love This Project
This DIY Shaker wall paneling project is:
-
Low cost – Around $100 total
-
Beginner friendly – Straight cuts and simple measurements
-
High impact – Adds visual interest and architectural detail
- The hardest part? Matching existing trim if you're extending wainscoting. Take your time, use a cordless brad nailer for speed and safety, and always follow shop safety best practices.
🧰 Tools & Materials
🛒 Materials List
🧰 Tool List
-
Miter Saw
-
Table Saw
-
Cordless Nail Gun Kit
-
Cordless Drill
- Orbital Sander
- Paint Brush Kit
- White Urethane Paint
- Level
- Putty Knife
- Square
🔩 Misc. Supplies
📌 Save or Share This Project!
Love this build? Pin it, share it, and follow along for more beginner-friendly woodworking projects, shop upgrades, and home DIY tutorials.
🔔 Subscribe on YouTube
📸 Follow on Instagram
🛠️ Explore Plans & Templates
If you have questions, leave a comment or send me a message—I’d love to help!


